This is the second part of the CIS Benchmarks blog post series. If you are new to CIS Benchmarks, I’d highly recommend you read Part 1 first, so you’ll have a basic understanding of Kubernetes CIS Benchmarks. After that, you can continue reading this post.
This post will show you how you can use kube-bench to check your Kubernetes clusters for Kubernetes CIS Benchmarks.
How do you install kube-bench?
You have two options here. You can either install it to the host or run it directly inside a container.
Both options will give you the same results, so whatever works for you will do the trick.
If you prefer to run it inside a container, you can find more information here.
I’ll walk you through the container method as it is more practical.
What is my setup?
I’ll quickly explain my setup, so if you’re going to try it, you’ll have a reference point.
I have 2 nodes: 1 control plane and 1 worker node.

The version of my cluster is v1.18.0, and this is done on purpose. I could have easily used the latest version of Kubernetes, but I want to show you how you can run kube-bench without using the latest version, as I’m aware many people do not update as soon as a new version becomes available.
And my nodes are running Ubuntu 18.04.5 LTS.
Action time!
Let’s see how we can check the control-plane first. As I’ve mentioned, I’m going to use kube-bench in a docker container.
Here is the command you need to run:
|
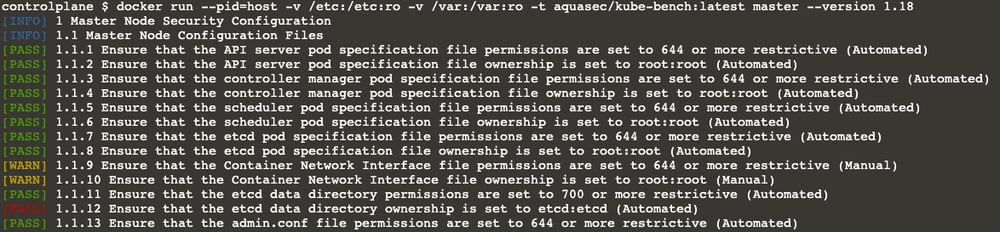
docker run --pid=host -v /etc:/etc:ro -v /var:/var:ro -t aquasec/kube-bench:latest master --version 1.18 |
When we run the kube-bench inside a container, we have to let it run in the host PID namespace; that’s why we pass the --pid=host argument to the docker run command.
We also need to mount the /etc and /var directories to check the existence and the permissions of the necessary files.
We have to tell kube-bench if we want to check master or node.
Kube-bench can determine the benchmark version using the kubectl or kubelet configurations. Still, in some cases, it is better to specify the cluster version explicitly. This is why our cluster is 1.18
And lastly, we pass the --version flag.
Drumroll, please
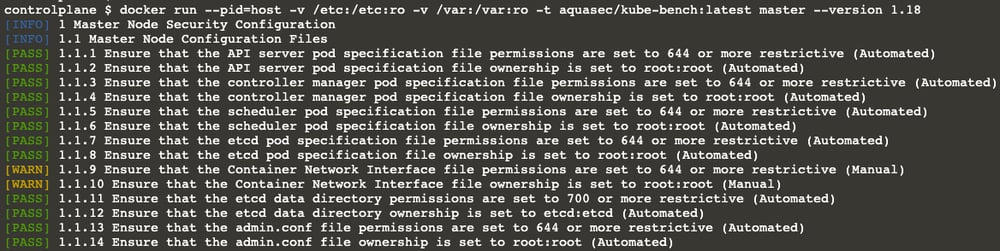
Don’t worry; it doesn’t take long. In a couple of seconds, you will see an output similar to the below. Hopefully, all lines with[PASS]
…
There are four different states for each subject.
- [PASS] indicates that everything is fine with the subject.
- [FAIL] means “Houston, we have a problem!” or somehow the test couldn’t be executed. You can see the details in the remediation section.
- [WARN] means the problem is not critical, but it’s still better to fix it. It may also mean you need to check this line manually. Again, you can see the details in the remediation section.
- [INFO] is just information you don’t need to worry about.
The output will be long because it checks many subjects, so don’t worry. Do you remember I told you about the massive 270-page long benchmark document in the last part? This is the tool version of it.
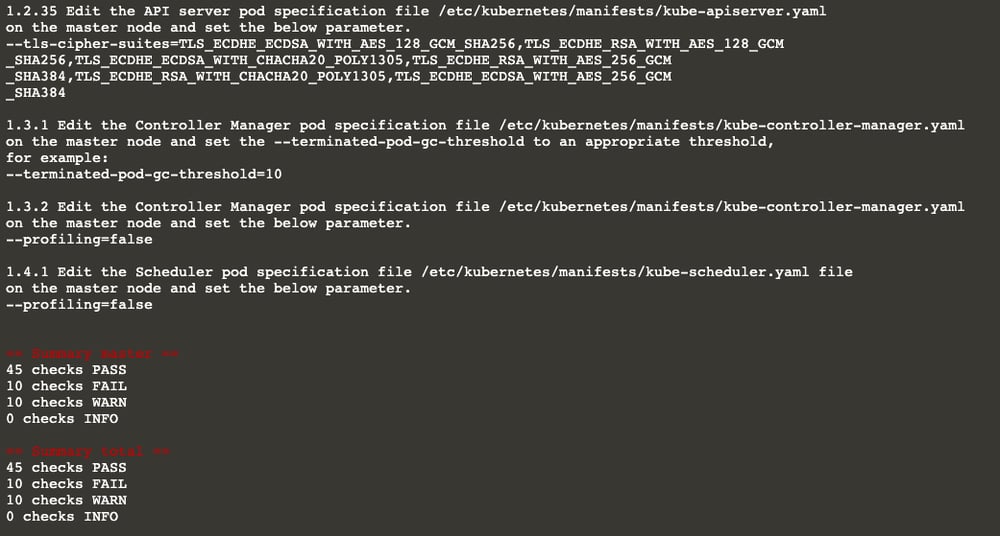
There are some FAIL’s and WARN’s, what now?
There is a high chance that you may get some FAIL’s and WARN’s in the output. Please do not panic.
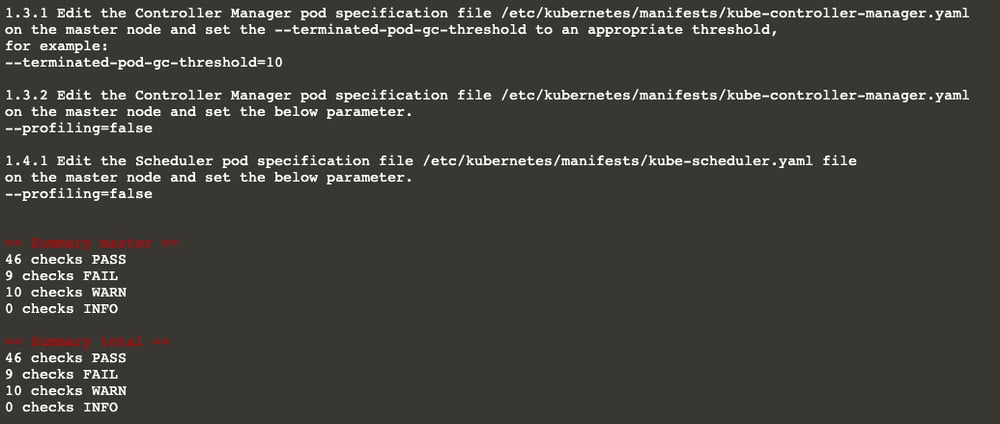
You’ll also see the remediations, a.k.a. the actions you need to take for each subject you get a [FAIL] and [WARN].

…
Time to fix it!
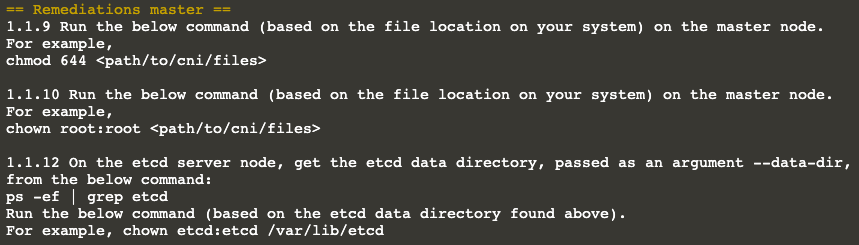
Let’s take a look at one of them, for instance: 1.1.12
kube-bench checks if etcd data directory ownership is set to etcd:etcd. Obviously, ours is not.
And the remediation tells us what to do! It even tells us which commands to run; let’s do whatever it suggests :)
Remediation tells us to check the etcd data directory first. Next, it asks us to change its owner to the user (and
group) etcd.
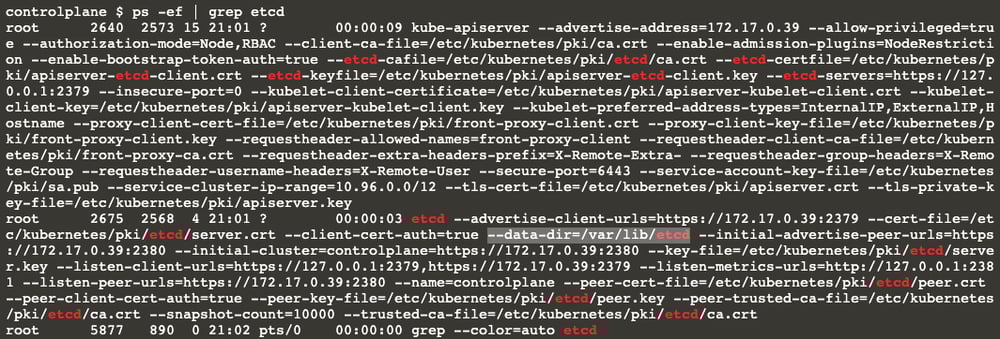
As you can see from the highlighted output, the etcd cluster data directory is /var/lib/etcd
Let’s move on; now it gives us the command chown etcd:etcd /var/lib/etcd

It should be fixed now, but it is always best practice to double-check ;)
Let’s run kube-bench again:
…
Viola!! Subject 1.1.12 is fixed now. As you can see, it is [PASS]
Also, the summary shows that the number of passing subjects is 46 now (it was 45 earlier).
What now?
At this point I assume you’ll go through all the subjects in the control-plane nodes and fix all of them. The next action should be doing the same thing for the worker nodes as well.
Do you remember the code we ran to check the control-plane?
In case you’ve forgotten, here is the code again to check the control-plane nodes:
|
docker run --pid=host -v /etc:/etc:ro -v /var:/var:ro -t aquasec/kube-bench:latest master --version 1.18 |
Please keep in mind that you should run this command in each control-plane node!
We have to change the master option to node to run the same command at the worker nodes.
|
docker run --pid=host -v /etc:/etc:ro -v /var:/var:ro -t aquasec/kube-bench:latest node --version 1.18 |
All you need to do is to log in to each worker node and run the command above. It will give you a similar output as the control-plane check, and you can fix any issues in the same way as you follow the remediations.

Thanks a lot for reading. I hope you find this post useful. Please do not hesitate to ask any questions you may have. We are more than happy to help!
Also, we offer a Kubernetes Security Audit. If you’d like to hear more about it, please take a look at it here.