Everyone wants to implement a secure system, but it’s a never-ending job. Day after day, new vulnerabilities come up, and we need to learn how to deal with them. If you’re looking for an adaptive, automated, and easy-to-use security solution for your container-based systems, you’re in the right place. Bion is an Anchore partner, and we’ll share the best practices and our production experiences with the Anchore Engine.
Anchore Engine Overview
The Anchore Engine provides us with a service to inspect and analyse the container images. It identifies the up-to-date vulnerabilities from various feeds and serves you from a single point. You can specify policies, and Anchore can evaluate the scan results against the user-defined policies. You can integrate it into your CI/CD pipeline or Kubernetes cluster. In this post, we’ll use the Anchore Engine to evaluate the requested container images on Kubernetes in real-time. Using the Admission Webhook feature, Anchore can intercept the Kubernetes API requests, analyse the container images and evaluate the user-defined policies. Let’s see this functional tool in action.
 https://docs.anchore.com/current/docs/overview/concepts/
Firstly, let’s interact with the Anchore Engine API using the CLI. I think it's the simplest way to explore the basic features. I’ll run all the components using docker-compose on my local computer.
- When you install the Anchore Engine for the first time, it needs to sync with the vulnerability feeds. This can take time depending on the network speed. (10+ minutes)
Hands-On Practice
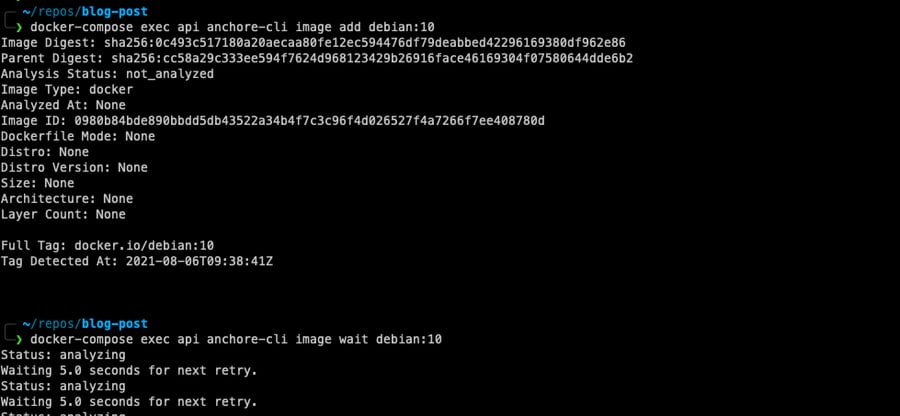
1. Add debian:10 image from CLI to be scanned and wait for the scan result.
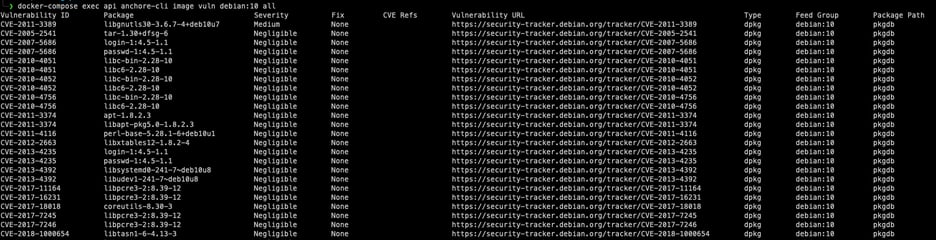
2. Let’s list vulnerabilities and take a look at the results. There are different levels of severity, such as high and critical. We can use these fields while preparing our policy file. The fix field is another important one because we don’t want to block an image if there is no available fix. For the detailed info, we can check the vulnerability URL.
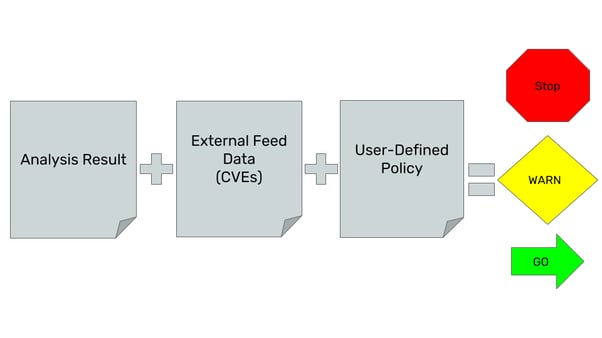
3. Now, we can define a policy to enforce some quality for the container images. For instance, we can block a k8s deployment if it doesn't match our expectations. Anchore accepts policies as JSON. We can specify rules by vulnerability levels. In the following JSON configuration, we’re blocking images that have vulnerabilities higher than medium severity and vulnerabilities that have an existing fix. It’s just a part of the real policy, and you can check out the official documentation for a complete overview.
|
{ "action": "STOP", "gate": "vulnerabilities", "trigger": "package", "params": [ { "name": "package_type", "value": "all" }, { "name": "severity_comparison", "value": ">" }, { "name": "severity", "value": "medium" }, { "name": "fix_available", "value": "true" } } |
Firstly, we’re adding the policy to the Anchore Engine. After that, we need to activate it.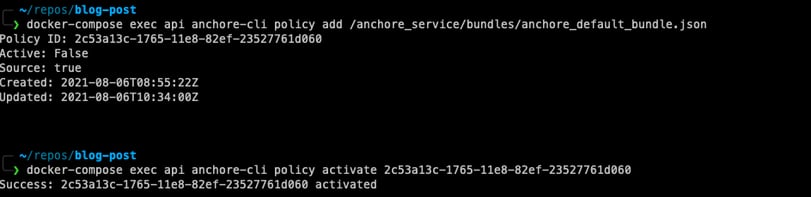
4. Finally, we can evaluate the results against a user-defined policy.
In the previous steps, we saw the general flow of the Anchore Engine, but it was a manual process. In the DevOps world, we don’t complete the tasks in this way. Therefore, let’s integrate the tool to the k8s cluster and build the automated flow.
Kubernetes Integration
“An admission controller is a Kubernetes-native feature that can intercept and process requests to the Kubernetes API prior to persistence of the object, but after the request is authenticated and t authorised. A custom webhook can be implemented to scan any image before it is deployed in the cluster. This admission controller could block deployments if the image doesn’t comply with the organization’s security policies.” - Kubernetes Hardening Guidance published by NSA.
Kubernetes has become the de-facto standard in container orchestrators thanks to its flexibility, scalability, and ease of use. Admission Controllers are features that make it flexible. They provide us with governance over the cluster, and we can implement an automated security mechanism using that feature. They can be thought of as a gatekeeper that intercepts API requests and may change the request object or deny the request altogether.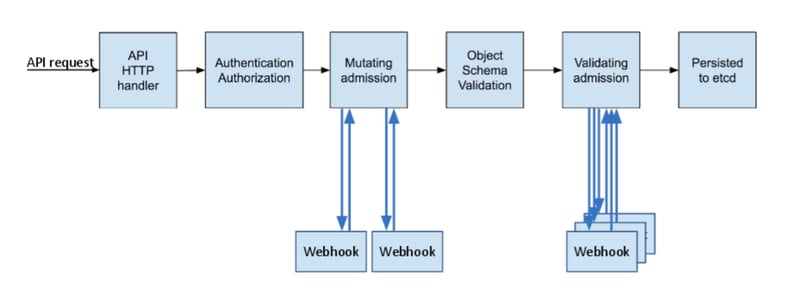
https://kubernetes.io/blog/2019/03/21/a-guide-to-kubernetes-admission-controllers/
Anchore uses an Admission Controller to integrate its features with Kubernetes. Anchore team provides us with a “Service implementation for a Kubernetes Dynamic Webhook controller for interacting with Anchore Engine''. Our ValidatingAdmissionWebhook configuration will redirect the incoming requests to this webhook implementation. Webhook controller pod will interact with the Anchore engine to decide whether to deny or accept the request. At this point, it would be beneficial to mention three different modes that configure the decision mechanism for our webhook controller component.
-
Strict Policy-Based Admission Gating Mode
This is the strictest mode and will admit only images already analysed by Anchore and that receive a "pass" on policy evaluation. Before using this mode in production, be sure you test the tool and understand its features. This enables you to ensure, for example, that no image is deployed into the cluster that has a known high-severity CVE with an available fix or any of several other conditions.
-
Analysis-Based Admission Gating Mode
This mode will admit only images that are analysed and known to Anchore, but it will not enforce any defined policy on the image. The analysis-based mode still blocks the deployment if the image hasn't been scanned yet. This is useful when you'd like to enforce a requirement that all images be deployed via a CI/CD pipeline. You can scan the images in the pipeline first and deploy only these scanned images to the Kubernetes.
-
Passive Analysis Trigger Mode
This mode analyses images but does not block execution on analysis completion or policy evaluation of the images. This mode is beneficial when you do experiments on the tool. It will prevent any unexpected blocks while you're learning the tool's behaviours. Additionally, this is a way to ensure that all images that make it to deployment are guaranteed to have some form of analysis audit trail available and a presence in reports and notifications managed by Anchore Engine.
I strongly suggest that you deploy the Anchore Engine using the Helm and Terraform. Helm allows us to deploy the group of Kubernetes components in an easily configurable way. Additionally, you can keep all your configurations as code using Terraform. When you use these two tools together, you end up with a maintainable and readable infrastructure.
Installing Anchore Engine
1. Deploy the anchore engine with the required configuration using Helm
helm upgrade -i $RELEASE_NAME -f ./engine-config.yml --repo https://charts.anchore.io/stable anchore-engine -n $NAMESPACE
engine-config.yml
|
anchoreGlobal: defaultAdminPassword: YourDefaultAdminpassword!3 defaultAdminEmail: test@test.com |
2. To be able to interact with the Anchore Engine API, we can deploy a pod that has anchore-cli package
kubectl run -i --tty anchore-cli --restart=Always --image anchore/engine-cli --env ANCHORE_CLI_USER=admin --env ANCHORE_CLI_PASS=${PASSWORD} --env ANCHORE_CLI_URL=http://${ANCHORE_ENGINE_API_SERVICE}.${NAMESPACE}.svc.cluster.local:8228/v1/
3. Check the system status from the deployed anchore-cli pod
anchore-cli system status
Setting up the Admission Controller
1. Create the secret for accessing the Anchore engine from the admission-controller pod
kubectl create secret generic anchore-credentials -n $NAMESPACE --from-file=credentials.json
credentials.json
|
{ "users": [ { "username": "admin", "password": "YourDefaultAdminpassword!3!"} ] } |
2. Deploy the admission controller in order to be able to intercept the pod creation requests. I’m referring to the policy (block_high_and_higher_severity_if_fix_available) in the YAML file. It’ll evaluate the images against this policy. This policy includes the vulnerability severity checks like it declared in the previous sections.
helm upgrade -i $RELEASE_NAME anchore/anchore-admission-controller -n $NAMESPACE -f admission-controller-values.yml
admission-controller-values.yml
|
existingCredentialsSecret: anchore-credentials anchoreEndpoint: # change variables with release name and namespace http://${ANCHORE_ENGINE_API_SERVICE}.${NAMESPACE}.svc.cluster.local:8228 # selectors are evaluated by order policySelectors: # if breakglass label exists, use it - Selector: ResourceType: "pod" SelectorKeyRegex: "^breakglass$" SelectorValueRegex: "^true$" PolicyReference: Username: "admin" PolicyBundleId: "block_high_and_higher_severity_if_fix_available" # Mode is one of: "policy", "analysis", or "breakglass". policy=>require policy pass, analysis=>require image analyzed, breakglass=>do nothing Mode: breakglass # apply the policy for only given namespace - Selector: ResourceType: namespace SelectorKeyRegex: name SelectorValueRegex: ^securenamespace$ PolicyReference: Username: "admin" # This is the default bundle id in anchore engine PolicyBundleId: "block_high_and_higher_severity_if_fix_available" # Mode is one of: "policy", "analysis", or "breakglass". policy=>require policy pass, analysis=>require image analyzed, breakglass=>do nothing Mode: policy # apply breakglass rule for the anchore-engine pods to prevent crash of the system - Selector: ResourceType: pod SelectorKeyRegex: app SelectorValueRegex: demo-anchore-engine PolicyReference: Username: "admin" PolicyBundleId: "block_high_and_higher_severity_if_fix_available" Mode: breakglass # default mode is breakglass - Selector: ResourceType: "image" SelectorKeyRegex: ".*" SelectorValueRegex: ".*" PolicyReference: Username: "admin" # This is the default bundle id in anchore engine PolicyBundleId: "block_high_and_higher_severity_if_fix_available" # Mode is one of: "policy", "analysis", or "breakglass". policy=>require policy pass, analysis=>require image analyzed, breakglass=>do nothing Mode: breakglass |
Best Practices
- It’s important to understand that every pod creation request will be redirected to the Anchore Engine to be validated and this might lead to failures, like blocking its own components. As a best practice, we can add a condition to ignore the Kubernetes system components.
- When an Anchore Engine pod is killed and restarted, our design can go into a crash loop because there will be no component to complete the scan. Therefore, it’s important to ignore the Anchore Engine pods using this label.
- Don’t block the deployments if a fix is not available for the vulnerability yet. You can add this condition to your policy.
- Observe the system behaviour in the test environments. While you’re learning the tool, you can use the Passive Analysis Trigger mode to prevent unexpected events.
Summary
In short, Anchore Engine is a very functional tool with a range of capabilities and use cases but we need to understand our needs and expectations before using it. Don’t forget that every tool brings complexity along with it.
Please check here if you want to know more about how we can secure your workloads using Anchore!