In this blog post, we will continue to explain how to go beyond good intentions with your tagging strategy in AWS.

Thanks to Service Control Policies (SCPs), we will show how they can strictly enforce policies without the importance of values in tags.
If you are not familiar with tag policies and AWS Organisations or missed part 1 of this blog post series, please check it out here[1].
What are service control policies (SCPs)?
Service control policies (SCPs) are a type of organisation policy that you can use to manage permissions in your organisation. SCPs offer central control over the maximum available permissions for all accounts in your organisation. SCPs help you to ensure your accounts stay within your organisation's access control guidelines. SCPs are available only in an organisation that has all features enabled. SCPs aren't available if your organisation has enabled only the consolidated billing features. For instructions on enabling SCPs, see Enabling and disabling policy types.[2]
Important!
SCPs don't affect users or roles in the management account. They affect only the member accounts in your organisation.
The Maximum size of SCPs
All characters in your SCP count against its maximum size. The examples in this blog post show the SCPs formatted with extra white space to improve their readability. If your Service Control Policy approaches the maximum size, you can delete any white space, such as space characters and line breaks outside quotation marks.
Inheritance of Service Control Policies
Inheritance for Service Control Policies behaves like a filter through which permissions flow to all parts of the tree below.
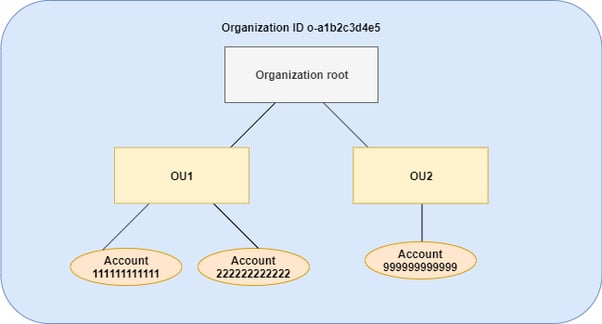
Example Organisation Inheritance Tree [3]
Imagine that the inverted tree structure of the organisation is made of branches that connect from the root to each of the OUs and end at the accounts. All AWS permissions flow into the root of the tree. Those permissions must then flow past the SCPs attached to the root, OUs, and the account to get to the principal (an IAM role or user) making a request. Each SCP can filter the permissions passing through to the levels below it. If an action is blocked by a deny statement, then all OUs and accounts affected by that SCP are denied access to that action. An SCP at a lower level can't add permission after it is blocked by an SCP at a higher level. SCPs can only filter; they never add permissions.
SCPs do not support inheritance operators that alter how elements of the policy are inherited by child OUs and accounts.
The following illustration shows how SCPs work.
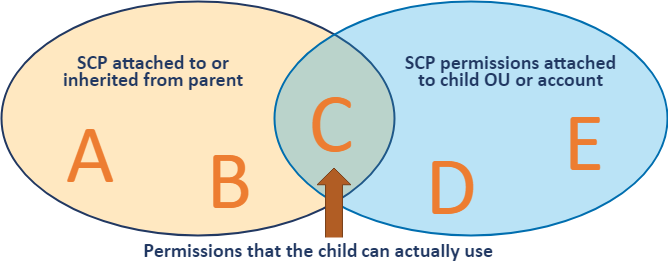
Example chart of the Inheritance of Service Control Policies (SCPs)[4]
What are the differences between Service Control Policies (SCPs) and Tag Policies?
Both are the types of organisation policies, SCP(s) have more use cases than Tag Policies. Tag Policies can be used only for tagging related policies.
In tag policies, tag key and value should match with the applied tag policy. Service control policies can accept any value with a compliant key.
Both can be used for the strictest possible tag enforcement in AWS.
I'll mention this perfect combination later on.[5]
Service Control Policy (SCPs) syntax and an example service control policy
Service control policies (SCPs) use a similar syntax to those used by AWS Identity and Access Management (IAM) permission policies and resource-based policies (like Amazon S3 bucket policies). For more information about IAM policies and their syntax, see Overview of IAM Policies in the IAM User Guide.
An SCP is a plaintext file that is structured according to the rules of JSON, and it uses the elements that are described in this topic.[6]
The following service control policy shows a sample "service control policy" syntax:
|
{ |
Example Service Control Policy
With this policy, we defined the action "ec2:RunInstances" which means this policy will take effect while running EC2 instances. At the "Resource" section of the Service Control Policy, we define which tag will be checked on EC2. In this case, we are checking instance tags and volume tags.
We've used a Null condition operator to check if a condition key is present at the time of authorisation. In the policy statement, use either true (the key doesn't exist — it is null) or false (the key exists and its value is not null).[7]
Finally, at the "Condition" section of the Service Control Policy, we enforce the tag key; in this case, the tag key is called "Name".
In conclusion, our Service Control Policy will take effect while running instances and will check tag keys on volumes and instances, and both should have a "Name" tag key as a value for those tag keys.
The Perfect Combination of Tag Policies and Service Control Policies (Optional)
If you would like to be more strict with your tagging strategy, you could use both of them.
If you are not familiar with tag policies and AWS Organisations or missed part 1 of this blog post series, please review it here[8].
As we explained earlier in this blog post, Service Control Policies don't check the values of the tags but tag policies do.
Because of that, the validation will be based only on tag keys.
Just enable both Policies from AWS Organisations, create a tag policy and service control policy based on your needs.
Tada!
That's all you need to do!
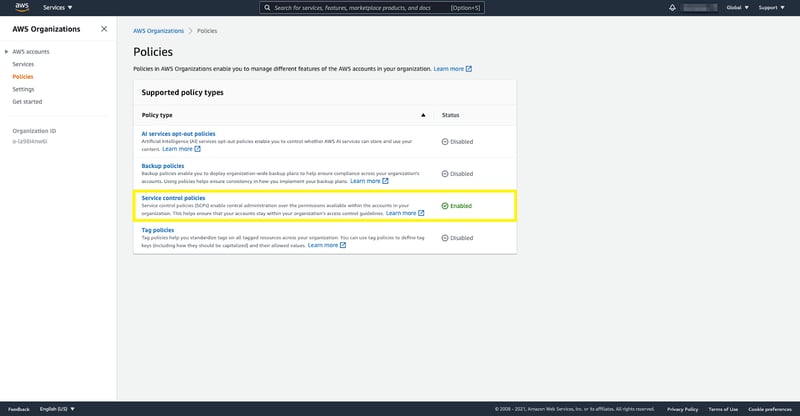
 Enabling Service Control Policy and Tag Policy
Tag Enforcement with Service Control Policies in Action!
First things first, you should be a part of the AWS Organisation. If you haven't already enabled the AWS Organisations or aren't sure about how to enable policies on your organisation, please check here[9] to find out more.
I'm assuming that you have already enabled AWS Organisations.
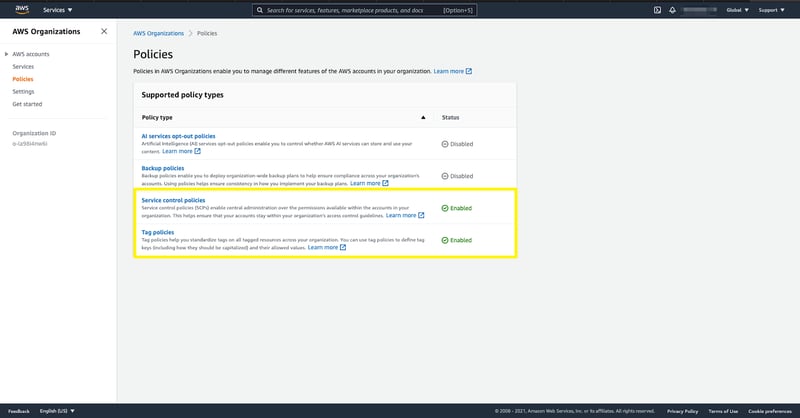
The next step is to enable our organisation's service control policies. To do that, select policies on the left-hand side, then click on service control policies and enable it.
AWS Organisations Policies Section
Great! We are done with prerequisites, and as a next step, we will create our service control policy. After creating the service control policy, we need to attach it to the organisational unit or organisation root. If you attach the policies to the organisation root, the policies will be applied for all OUs as shown below.
Reminder!
SCPs don't affect users or roles in the management account. They affect only the member accounts in your organisation.
In this case, I'll attach the tag policy to the organisation's root.
So, as we explained earlier in this blog post, if you attach an organisation policy to organisation root, all the OU and accounts inherit that policy.
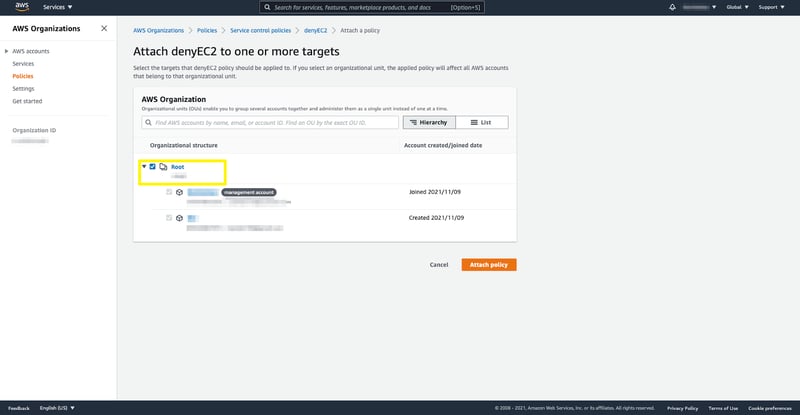 Attaching Service Control Policy to the organisational unit.
Test Flight!
For testing our tag enforcement, I'll try to create an EC2 instance with a non-compliant tag with a tag key Bion. As we defined in our Service Control Policy, "Bion" is not a compliant key, so it should not allow the creation of an EC2 instance with this tag key.
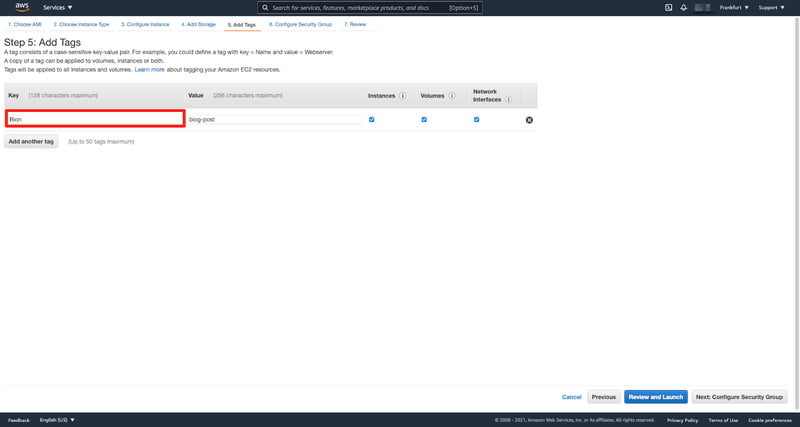 Example non-compliant Tag Key
 Creating an EC2 Instance with non-compliant tag key
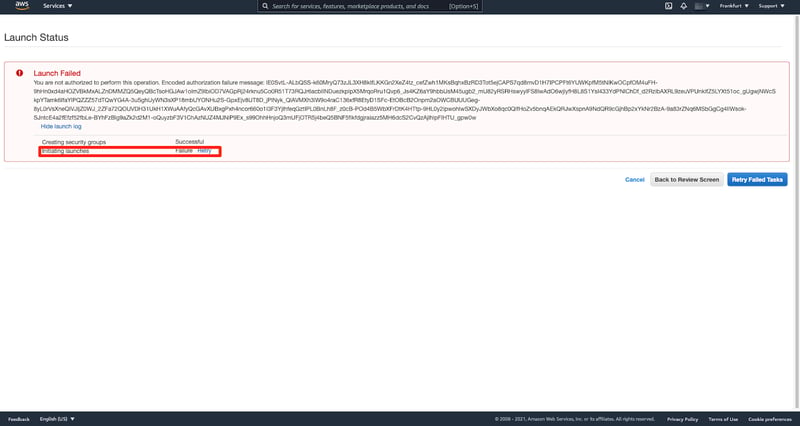
It worked as expected.
Let's see the decoded authorisation failure message.
Don't you know how to enable encoded messages?
No worries, you just need to replace the <message> with your own encoded message. Then run the below command. You should also have the required permissions and configured aws cli to do that.[10]
|
aws sts decode-authorization-message --encoded-message <message> |
|
{ |
Decoded error message
Now let's try with a compliant tag key. Earlier in this blog post, we defined the compliant tag key as "Name" without the importance of the tag value. In this case, let's try with the following tag value "bion-scp-ec2".
 Example compliant Tag Key
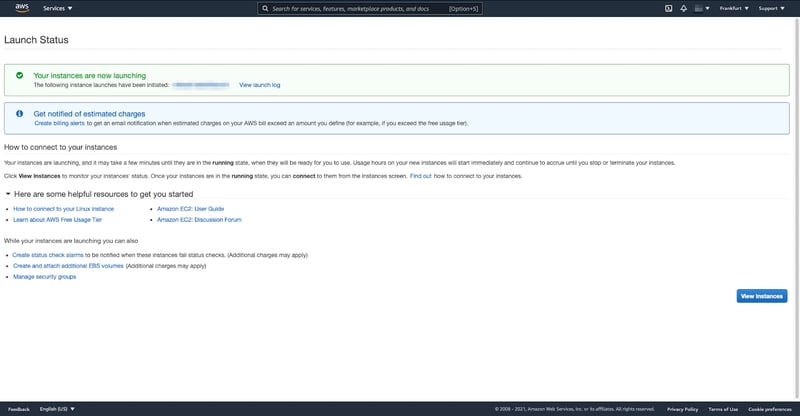 Creating an EC2 Instance with compliant tag key

We successfully enforced our tag key with the help of the service control policies and now we have more control over our tagging strategy.
I hope you found this helpful. If you enjoyed reading it, please don't forget to share.